Category: Kubernetes

  • Essential Kubernetes Architecture: 8 Must-Know Elements

    Essential Kubernetes Architecture: 8 Must-Know Elements

    Big Data Analytics

    Have you ever tried to explain essential Kubernetes architecture to someone who’s never heard of it before? I have, and it’s not easy! Back when I first started exploring container orchestration after years of managing traditional servers, I felt like I was learning a new language.

    Essentials Kubernetes architecture can seem overwhelming at first glance, especially for students and recent graduates preparing to enter the tech industry. But breaking down this powerful system into its core components makes it much more approachable.

    In this post, I’ll walk you through the 8 essential elements of Kubernetes architecture that you need to know. Whether you’re preparing for interviews or gearing up for your first deployment, understanding these fundamentals will give you a solid foundation.

    Understanding Kubernetes Architecture Fundamentals

    Kubernetes architecture does one main thing – it automates how your containerized apps get deployed, scaled, and managed. Think of it as a smart system that handles all the heavy lifting of running your apps. After my B.Tech from Jadavpur University, I jumped into the world of product development where I quickly realized how container management was revolutionizing software delivery.

    When I first started working with containers, I was using Docker directly. It was great for simple applications, but as our infrastructure grew more complex, managing dozens of containers across multiple environments became a nightmare. That’s when Kubernetes entered the picture for me.

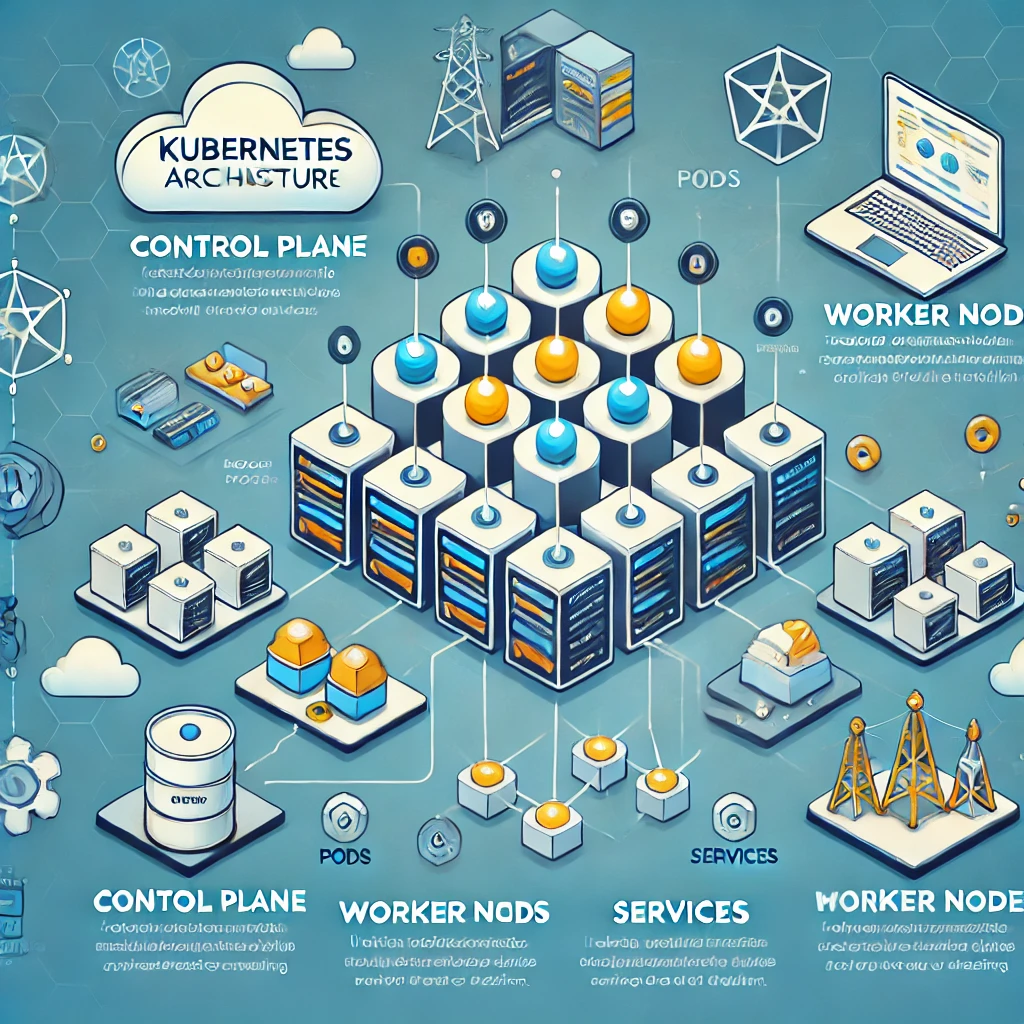
    At its core, Kubernetes follows a master/worker architecture pattern:

    • Control Plane (Master): The brain that makes global decisions about the cluster
    • Worker Nodes: The muscles that run your applications

    This separation of responsibilities creates a system that’s both powerful and resilient. I’ve seen this architecture save the day many times when parts of our infrastructure failed but the applications kept running.

    Control Plane Components: The Brain of Kubernetes

    API Server: The Communication Hub

    The API server works like a receptionist at a busy office. Everything and everyone must go through it first. Want to create a new app deployment? Talk to the API server. Need to check on your running apps? Ask the API server. It’s the front desk for all tasks in Kubernetes.

    I remember one project where we were experiencing mysterious connection issues within our cluster. After hours of debugging, we discovered it was related to API server resource limits. We’d been too conservative with our resource allocation, causing the API server to become a bottleneck during peak loads.

    The API server validates and processes RESTful requests, ultimately saving state to etcd. It acts as the gatekeeper, ensuring only authorized operations proceed.

    etcd: The Cluster’s Brain

    If the API server is the receptionist, etcd is the filing cabinet where all the important documents are stored. It’s a consistent and highly-available key-value store that maintains the state of your entire Kubernetes cluster.

    Early in my container journey, I learned the hard way about the importance of etcd backups. During a cluster upgrade, we had an unexpected failure that corrupted our etcd data. Without a recent backup, we had to rebuild portions of our application configuration from scratch—a painful lesson!

    For any production environment, I now always implement:

    • Regular etcd backups
    • High availability with at least 3 etcd nodes
    • Separate disk volumes with good I/O performance for etcd

    Scheduler: The Workload Placement Decision-Maker

    The Scheduler is like the seating host at a restaurant, deciding which table (node) gets which customers (pods). It watches for newly created pods without an assigned node and selects the best node for them to run on.

    The scheduling decision takes into account:

    • Resource requirements
    • Hardware/software constraints
    • Affinity/anti-affinity specifications
    • Data locality
    • Workload interference

    Once, we had an application that kept getting scheduled on nodes that would run out of resources. By adding more specific resource requests and limits, along with some node affinity rules, we guided the scheduler to make better decisions for our workload patterns.

    Controller Manager: The Operations Overseer

    The Controller Manager is like a team of supervisors watching over different parts of your cluster. Each controller has one job – to make sure things are running exactly how you wanted them to run. If something’s not right, these controllers fix it automatically.

    Some key controllers include:

    • Node Controller: Notices and responds when nodes go down
    • Replication Controller: Maintains the correct number of pods
    • Endpoints Controller: Populates the Endpoints object
    • Service Account & Token Controllers: Create accounts and API access tokens

    I’ve found that understanding these controllers is crucial when troubleshooting cluster issues. For example, when nodes in our development cluster kept showing as “NotReady,” investigating the node controller logs helped us identify networking issues between our control plane and worker nodes.

    Key Takeaway: The control plane components work together to maintain your desired state. Think of them as the management team that makes sure everything runs smoothly without your constant attention.

    Worker Node Components: The Muscle of Kubernetes

    Kubelet: The Node Agent

    Kubelet is like the manager at each worker node, making sure containers are running in a Pod. It takes a set of PodSpecs provided by the API server and ensures the containers described are running and healthy.

    When I was first learning Kubernetes, I found Kubelet logs to be my best friend for debugging container startup issues. They show exactly what’s happening during container creation and can reveal problems with image pulling, volume mounting, or container initialization.

    A typical issue I’ve faced is when Kubelet can’t pull container images due to registry authentication problems. Checking the Kubelet logs will quickly point to this issue with messages about failed pull attempts.

    Kube-proxy: The Network Facilitator

    Kube-proxy maintains network rules on each node, allowing network communication to your Pods from inside or outside the cluster. It’s the component that makes Services actually work.

    In one project, we were using a service to access a database, but connections were periodically failing. The issue turned out to be kube-proxy’s default timeout settings, which were too aggressive for our database connections. Adjusting these settings resolved our intermittent connection problems.

    Kube-proxy operates in several modes:

    • IPTABLES (default): Uses Linux iptables rules
    • IPVS: For higher performance and more load balancing algorithms
    • Userspace (legacy): An older, less efficient mode

    Container Runtime: The Execution Engine

    The container runtime is the software that actually runs your containers. It’s like the engine in a car – you don’t interact with it directly, but nothing works without it. While Docker might be the most well-known container runtime, Kubernetes supports several options:

    • containerd
    • CRI-O
    • Docker Engine (via dockershim, though this is being phased out)

    When I first started with Kubernetes, Docker was the default runtime. But as the ecosystem matured, I’ve migrated clusters to containerd for better performance and more direct integration with Kubernetes.

    The container runtime handles:

    • Pulling images from registries
    • Starting and stopping containers
    • Mounting volumes
    • Managing container networking

    Key Takeaway: Worker node components do the actual work of running your applications. They follow instructions from the control plane but operate independently, which makes Kubernetes resilient to failures.

    Add-ons and Tools: Extending Functionality

    While the core components provide the foundation, add-ons extend Kubernetes functionality in critical ways:

    Add-on Type Popular Options Function
    Networking Calico, Flannel, Cilium Pod-to-pod networking and network policies
    Storage Rook, Longhorn, CSI drivers Persistent storage management
    Monitoring Prometheus, Grafana, Datadog Metrics collection and visualization
    Logging Elasticsearch, Fluentd, Loki Log aggregation and analysis

    I’ve learned that picking the right add-ons can make or break your Kubernetes experience. During one project, my team needed strict network security rules between services. We chose Calico instead of simpler options like Flannel, which made a huge difference in how easily we could control traffic between our apps.

    Kubernetes Architecture in Action: A Simple Example

    Let’s see how all these components work together with a simple example. Imagine you’re deploying a basic web application that consists of a frontend and a backend service.

    Here’s what happens when you deploy this application:

    1. You submit a deployment manifest to the API Server
    2. The API Server validates the request and stores it in etcd
    3. The Deployment Controller notices the new deployment and creates a ReplicaSet
    4. The ReplicaSet Controller creates Pod objects
    5. The Scheduler assigns each Pod to a Node
    6. The Kubelet on that Node sees the Pod assignment
    7. Kubelet tells the Container Runtime to pull and run the container images
    8. Kube-proxy updates network rules to make the Pods accessible

    This whole process typically takes just seconds. And the best part? Once it’s running, Kubernetes keeps monitoring everything. If a pod crashes or a node fails, Kubernetes automatically reschedules the workloads to maintain your desired state.

    While working on an e-commerce platform, we needed to handle high-traffic events like flash sales. Understanding how these components interact helped us design an architecture that could dynamically scale based on traffic patterns. We set up Horizontal Pod Autoscalers linked to Prometheus metrics so our platform could automatically expand capacity during traffic spikes.

    One interesting approach I’ve implemented is running different workload types on dedicated node pools. For instance, stateless API services on one node pool and database workloads on nodes with SSD-backed storage. This separation helps optimize resource usage and performance while letting the scheduler make appropriate placement decisions.

    Common Challenges for Kubernetes Newcomers

    When you’re just starting with Kubernetes, you’ll likely face some common hurdles:

    • Configuration complexity: YAML files can be finicky, and a small indentation error can break everything
    • Networking concepts: Understanding services, ingress, and network policies takes time
    • Resource management: Setting appropriate CPU/memory limits is more art than science at first
    • Troubleshooting skills: Knowing which logs to check and how to diagnose issues comes with experience

    I remember spending hours debugging my first deployment only to find I had used the wrong port number in my service definition. These experiences are frustrating but incredibly valuable for learning how Kubernetes actually works.

    Kubernetes Knowledge and Your Career

    If you’re aiming for a job in cloud engineering, DevOps, or even modern software development, understanding Kubernetes architecture will give you a major advantage in interviews and real-world projects. Several entry-level roles where Kubernetes knowledge is valuable include:

    • Junior DevOps Engineer
    • Cloud Support Engineer
    • Site Reliability Engineer (SRE)
    • Platform Engineer
    • Backend Developer (especially in microservices environments)

    Companies increasingly run their applications on Kubernetes, making this knowledge transferable across industries and organizations. I’ve seen recent graduates who understand containers and Kubernetes fundamentals get hired faster than those with only traditional infrastructure experience.

    FAQ Section

    What are the main components of Kubernetes architecture?

    Kubernetes architecture consists of two main parts:

    • Control Plane components: API Server, etcd, Scheduler, and Controller Manager
    • Worker Node components: Kubelet, Kube-proxy, and Container Runtime

    Each component has a specific job, and they work together to create a resilient system for running containerized applications. The control plane components make global decisions about the cluster, while the worker node components run your actual application workloads.

    How does Kubernetes manage containers?

    Kubernetes doesn’t directly manage containers—it manages Pods, which are groups of containers that are deployed together on the same host. The container lifecycle is handled through several steps:

    1. You define the desired state in a YAML file (like a Deployment)
    2. Kubernetes Control Plane schedules these Pods to worker nodes
    3. Kubelet ensures containers start and stay running
    4. Container Runtime pulls images and runs the actual containers

    For example, when deploying a web application, you might specify that you want 3 replicas. Kubernetes will ensure that 3 Pods are running your application containers, even if nodes fail or containers crash.

    What’s the difference between control plane and worker nodes?

    I like to think of this as similar to a restaurant. The control plane is like the management team (the chef, manager, host) who decide what happens and when. The worker nodes are like the kitchen staff who actually prepare and serve the food.

    Control plane nodes make global decisions about the cluster (scheduling, detecting failures, etc.) while worker nodes run your actual application workloads. In production environments, you’ll typically have multiple control plane nodes for high availability and many worker nodes to distribute your workloads.

    Is Kubernetes architecture cloud-provider specific?

    No, and that’s one of its greatest strengths! Kubernetes is designed to be cloud-provider agnostic. You can run Kubernetes on:

    • Public clouds (AWS, GCP, Azure)
    • Private clouds (OpenStack, VMware)
    • Bare metal servers
    • Even on your laptop for development

    While working on different products, I’ve deployed Kubernetes across multiple cloud environments. The core architecture remains the same, though some implementation details like storage and load balancer integration will differ based on the underlying platform.

    How does Essential Kubernetes architecture handle scaling?

    Kubernetes offers multiple scaling mechanisms:

    • Horizontal Pod Autoscaling: Automatically increases or decreases the number of Pods based on CPU utilization or custom metrics
    • Vertical Pod Autoscaling: Adjusts the CPU and memory resources allocated to Pods
    • Cluster Autoscaling: Automatically adds or removes nodes based on pending Pods

    In a recent project, we implemented horizontal autoscaling based on queue length metrics from RabbitMQ. When message queues grew beyond a certain threshold, Kubernetes automatically scaled up our processing Pods to handle the increased load, then scaled them back down when the queues emptied.

    What happens when a worker node fails?

    When a worker node fails, Kubernetes automatically detects the failure through the Node Controller, which monitors node health. Here’s what happens next:

    1. The Node Controller marks the node as “NotReady”
    2. If the node remains unreachable beyond a timeout period, Pods on that node are marked for deletion
    3. The Controller Manager creates replacement Pods
    4. The Scheduler assigns these new Pods to healthy nodes

    I’ve experienced node failures in production, and the self-healing nature of Kubernetes is impressive to watch. Within minutes, all our critical services were running again on other nodes, with minimal impact to users.

    Kubernetes Architecture: The Big Picture

    Understanding Kubernetes architecture is essential for anyone looking to work with modern cloud applications. The 8 essential elements we’ve covered form the backbone of any Kubernetes deployment:

    1. API Server
    2. etcd
    3. Scheduler
    4. Controller Manager
    5. Kubelet
    6. Kube-proxy
    7. Container Runtime
    8. Add-ons and Tools

    While the learning curve may seem steep at first, focusing on these core components one at a time makes the journey manageable. My experience across multiple products and domains has shown me that Kubernetes knowledge is highly transferable and increasingly valued in the job market.

    As container orchestration continues to evolve, Kubernetes remains the dominant platform with a growing ecosystem. Starting with a solid understanding of its architecture will give you a strong foundation for roles in cloud engineering, DevOps, and modern application development.

    Ready to continue your Kubernetes journey? Check out our Interview Questions page to prepare for technical interviews, or dive deeper with our Learn from Video Lectures platform where we cover advanced Kubernetes topics and hands-on exercises that will help you master these concepts.

    What aspect of Kubernetes architecture are you most interested in learning more about? Share your thoughts in the comments below!

  • Kubernetes vs Docker? 5 Key Differences to Help You Choose the Right Tool

    Kubernetes vs Docker? 5 Key Differences to Help You Choose the Right Tool

    Container usage has skyrocketed by 300% in enterprises over the last three years, making containerization one of the hottest skills in tech today. But with this growth comes confusion, especially when people talk about Kubernetes and Docker as if they’re competitors. I remember feeling completely lost when my team decided to adopt Kubernetes after we’d been using Docker for years.

    My Journey from Docker to Kubernetes

    After I graduated from Jadavpur University and landed my first engineering role at a growing product company, our team relied entirely on simple Docker containers for deployment. I had no idea how much this would change. Fast forward two years, and I found myself struggling to understand why we suddenly needed this complex thing called Kubernetes when Docker was working fine. The transition wasn’t easy—I spent countless late nights debugging YAML files and questioning my life choices—but understanding the relationship between these technologies completely changed how I approach deployment architecture.

    In this article, I’ll clarify what Docker and Kubernetes actually are, how they relate to each other, and the key differences between them. By the end, you’ll understand when to use each technology and how they often work best together rather than as alternatives to each other.

    What is Docker?

    Docker is a platform that allows you to build, package, and run applications in containers. Think of containers as lightweight, standalone packages that include everything needed to run an application: code, runtime, system tools, libraries, and settings.

    Before Docker came along, deploying applications was a nightmare. Developers would write code that worked perfectly on their machines but failed when deployed to production. “But it works on my machine!” became such a common phrase that it turned into a meme.

    Docker solved this problem by creating containers that run exactly the same regardless of the environment. This consistency between development and production environments was revolutionary.

    The main components of Docker include:

    • Docker Engine: The runtime that builds and runs containers
    • Docker Hub: A repository for sharing container images
    • Docker Compose: A tool for defining multi-container applications

    I still vividly remember sweating through my first Docker project. My manager dropped a bombshell on me: “Daniyaal, I need you to containerize this ancient legacy app with dependencies that nobody fully understands.” I panicked initially, but what would have taken weeks of environment setup headaches was reduced to writing a Dockerfile and running a few commands. That moment was when I truly understood the magic of containers—the portability and consistency were game-changing for our team.

    What is Kubernetes?

    Kubernetes (often abbreviated as K8s) is a container orchestration platform that automates the deployment, scaling, and management of containerized applications. It was originally developed by Google and is now maintained by the Cloud Native Computing Foundation.

    While Docker helps you create and run containers, Kubernetes helps you manage many containers at scale. Think of it as the difference between caring for one plant versus managing an entire botanical garden.

    When I first started learning Kubernetes, these core components confused me until I started thinking of them like this:

    • Pods: Think of these as tiny apartments that house one or more container roommates
    • Nodes: These are the buildings where many pods live together
    • Clusters: This is the entire neighborhood of buildings managed as a community

    Kubernetes handles essential tasks like:

    • Distributing containers across multiple servers
    • Automatically restarting failed containers
    • Scaling your application up or down based on demand
    • Rolling out updates without downtime
    • Load balancing between containers

    My first experience with Kubernetes was intimidating, to say the least. During a major project migration, we had to move from a simple Docker setup to Kubernetes to handle increased scale. I remember spending an entire weekend trying to understand why my pods kept crashing, only to discover I’d misunderstood how persistent volumes worked. The learning curve was steep, and I spent many late nights debugging YAML files and questioning my life choices. But once our cluster was running smoothly, the benefits became clear – our application became much more resilient and easier to scale.

    How Docker and Kubernetes Work Together

    One of the biggest misconceptions I encounter is that you need to choose between Docker and Kubernetes. In reality, they serve different purposes and often work together in a typical deployment pipeline:

    1. You build your application container using Docker
    2. You push that container to a registry
    3. Kubernetes pulls the container and orchestrates it in your cluster

    Think of it this way: Docker is like a car manufacturer that builds vehicles, while Kubernetes is like a fleet management system that coordinates many vehicles, ensures they’re running efficiently, and replaces them when they break down.

    While Docker does have its own orchestration tool called Docker Swarm, most organizations choose Kubernetes for complex orchestration needs due to its robust feature set and massive community support.

    Kubernetes vs Docker: 5 Key Differences

    1. Purpose and Scope

    Docker focuses on building and running individual containers. Its primary goal is to package applications with their dependencies into standardized units that can run consistently across different environments.

    Kubernetes focuses on orchestrating multiple containers across multiple machines. It’s designed to manage container lifecycles, providing features like self-healing, scaling, and rolling updates.

    I like to explain this with a restaurant analogy. Docker is like a chef who prepares individual dishes, while Kubernetes is like the restaurant manager who coordinates the entire dining experience – seating guests, managing waitstaff, and ensuring everything runs smoothly.

    2. Scalability Capabilities

    Docker offers basic scaling through Docker Compose and Docker Swarm, which work well for smaller applications. You can manually scale services up or down as needed.

    Kubernetes provides advanced auto-scaling based on CPU usage, memory consumption, or custom metrics. It can automatically distribute the load across your cluster and scale individual components of your application independently.

    I learned this difference the hard way when our e-commerce application crashed during a flash sale. With our Docker-only setup, I was frantically trying to scale services manually as our site crawled to a halt. After migrating to Kubernetes, the platform automatically scaled our services to handle variable loads, and we never experienced the same issue again. This saved not just our users’ experience but also prevented those stressful 3 AM emergency calls.

    3. Architecture Complexity

    Docker has a relatively simple architecture that’s easy to understand and implement. Getting started with Docker typically takes hours or days. My initial Docker setup took me just an afternoon to grasp the basics.

    Kubernetes has a much more complex architecture with many moving parts. The learning curve is steeper, and setting up a production-ready cluster can take weeks or months. I spent nearly three months becoming comfortable with Kubernetes concepts.

    When I mentor newcomers transitioning from college to their first tech jobs, I always start with Docker fundamentals before introducing Kubernetes concepts. Understanding containers is essential before jumping into container orchestration. As one of my mentees put it, “trying to learn Kubernetes before Docker is like trying to learn how to conduct an orchestra before knowing how to play an instrument.”

    4. Deployment Strategies

    Docker offers basic deployment capabilities. You can replace containers, but advanced strategies like rolling updates require additional tooling.

    Kubernetes has sophisticated built-in deployment strategies, including:

    • Rolling updates (gradually replacing containers)
    • Blue-green deployments (maintaining two identical environments)
    • Canary deployments (testing changes with a subset of users)

    These strategies allow for zero-downtime deployments and quick rollbacks if something goes wrong. In a previous project, we reduced our deployment-related downtime from hours to minutes by implementing Kubernetes rolling updates. Our CTO actually hugged me when I showed him how quickly we could now roll back a problematic deployment—something that had previously caused him many sleepless nights.

    5. Ecosystem and Community Support

    Docker has a robust ecosystem focused primarily on containerization. Docker Hub provides access to thousands of pre-built container images.

    Kubernetes has an enormous ecosystem that extends far beyond just container orchestration. There are hundreds of tools and extensions for monitoring, security, networking, and storage that integrate with Kubernetes.

    The Kubernetes community is significantly larger and more active, with regular contributions from major tech companies. This extensive support means faster bug fixes, more feature development, and better documentation. When I got stuck trying to implement a complex network policy in Kubernetes, I posted a question on a community forum and had three detailed solutions within hours. This level of community support has saved me countless times.

    Feature Docker Kubernetes
    Primary Function Building and running containers Orchestrating containers at scale
    Scalability Basic manual scaling Advanced auto-scaling
    Complexity Simpler architecture Complex architecture
    Deployment Options Basic deployment Advanced deployment strategies
    Community Size Moderate Very large

    FAQ: Common Questions About Kubernetes vs Docker

    What’s the difference between Kubernetes and Docker?

    Docker is a containerization platform that packages applications with their dependencies, while Kubernetes is an orchestration platform that manages multiple containers across multiple machines. Docker focuses on creating and running individual containers, while Kubernetes focuses on managing many containers at scale.

    Can Kubernetes run without Docker?

    Yes, Kubernetes can run without Docker. While Docker was the default container runtime for Kubernetes for many years, Kubernetes now supports multiple container runtimes through the Container Runtime Interface (CRI). Alternatives include containerd (a stripped-down version of Docker) and CRI-O.

    In fact, Kubernetes deprecated Docker as a container runtime in version 1.20, though Docker-built containers still work perfectly with Kubernetes. This change affects how Kubernetes runs containers internally but doesn’t impact the containers themselves.

    Is Docker being replaced by Kubernetes?

    No, Docker isn’t being replaced by Kubernetes. They serve different purposes and complement each other in the containerization ecosystem. Docker remains the most popular tool for building and running containers, while Kubernetes is the standard for orchestrating containers at scale.

    Even as organizations adopt Kubernetes, Docker continues to be widely used for container development and local testing. The two technologies work well together, with Docker focusing on the container lifecycle and Kubernetes focusing on orchestration.

    Which should I learn first: Docker or Kubernetes?

    Definitely start with Docker. Understanding containers is essential before you can understand container orchestration. Docker has a gentler learning curve and provides the foundation you need for Kubernetes.

    Once you’re comfortable with Docker concepts and have built some containerized applications, you’ll be better prepared to tackle Kubernetes. This approach will make the Kubernetes learning curve less intimidating. In my own learning journey, I spent about six months getting comfortable with Docker before diving into Kubernetes.

    Is Kubernetes overkill for small applications?

    Yes, Kubernetes can be overkill for small applications. The complexity and overhead of Kubernetes are rarely justified for simple applications with predictable traffic patterns.

    For smaller projects, Docker combined with Docker Compose is often sufficient. You get the benefits of containerization without the operational complexity of Kubernetes. As your application grows and your orchestration needs become more complex, you can consider migrating to Kubernetes.

    Learning Kubernetes vs Docker

    So do you need to know Docker to use Kubernetes? Yes, understanding Docker is practically a prerequisite for learning Kubernetes. You need to grasp container concepts before you can effectively orchestrate them.

    Here’s the learning path I wish someone had shared with me when I started:

    1. Start with Docker basics – learn to build and run containers (I recommend trying docker run hello-world as your first command)
    2. Master Docker Compose for multi-container applications
    3. Learn Kubernetes fundamentals (pods, deployments, services)
    4. Gradually explore more advanced Kubernetes concepts

    For Docker, I recommend starting with the official Docker tutorials and documentation. They’re surprisingly beginner-friendly and include hands-on exercises.

    For Kubernetes, Kubernetes.io offers an interactive tutorial that covers the basics. Once you’re comfortable with those concepts, the Certified Kubernetes Administrator (CKA) study materials provide a more structured learning path.

    Need help preparing for technical interviews that test these skills? Check out our interview questions page for practice problems specifically targeting Docker and Kubernetes concepts!

    When to Use Docker Alone

    Docker without Kubernetes is often sufficient for:

    1. Local development environments: Docker makes it easy to set up consistent development environments across a team.
    2. Simple applications: If you’re running a small application with stable traffic patterns, Docker alone might be enough.
    3. Small teams with limited operational capacity: Kubernetes requires additional expertise and maintenance.
    4. CI/CD pipelines: Docker containers are perfect for creating consistent build environments.

    In my consultancy work, I’ve seen many startups effectively using Docker without Kubernetes. One client built a content management system using just Docker Compose for their staging and production environments. With predictable traffic and simple scaling needs, this approach worked perfectly for them. They used the command docker-compose up -d --scale web=3 to run three instances of their web service, which was sufficient for their needs.

    When to Implement Kubernetes

    Kubernetes becomes valuable when you have:

    1. Microservice architectures: When managing dozens or hundreds of services, Kubernetes provides organization and consistency.
    2. High availability requirements: Kubernetes’ self-healing capabilities ensure your application stays up even when individual components fail.
    3. Variable workloads: If your traffic fluctuates significantly, Kubernetes can automatically scale to meet demand.
    4. Complex deployment requirements: For zero-downtime deployments and sophisticated rollout strategies.
    5. Multi-cloud or hybrid cloud strategies: Kubernetes provides consistency across different cloud providers.

    I worked with an e-learning platform that experienced massive traffic spikes during exam periods followed by quieter periods. Implementing Kubernetes allowed them to automatically scale up during peak times and scale down during off-peak times, saving considerable infrastructure costs. They implemented a Horizontal Pod Autoscaler that looked something like this:

    apiVersion: autoscaling/v2
    kind: HorizontalPodAutoscaler
    metadata:
      name: exam-service-hpa
    spec:
      scaleTargetRef:
        apiVersion: apps/v1
        kind: Deployment
        name: exam-service
      minReplicas: 3
      maxReplicas: 20
      metrics:
      - type: Resource
        resource:
          name: cpu
          target:
            type: Utilization
            averageUtilization: 70

    This simple configuration allowed their service to automatically scale based on CPU usage, ensuring that during exam periods they could handle thousands of concurrent students without manual intervention.

    Current Trends in Container Technology (2023-2024)

    As we move through 2023 and into 2024, several trends are shaping the container landscape:

    1. Serverless Kubernetes: Services like AWS Fargate, Azure Container Instances, and Google Cloud Run are making it possible to run containers without managing the underlying infrastructure.
    2. WebAssembly: Some are exploring WebAssembly as a lighter alternative to containers, especially for edge computing.
    3. GitOps: Tools like ArgoCD and Flux are automating Kubernetes deployments based on Git repositories.
    4. Security focus: With container adoption mainstream, security scanning and policy enforcement have become essential parts of the container workflow.

    In my recent projects, I’ve been especially excited about the GitOps approach. Being able to declare your entire infrastructure as code in a Git repository and have it automatically sync with your Kubernetes cluster has been a game-changer for my team’s workflow. If you’ve already mastered basic Docker and Kubernetes, exploring these newer trends can give you an edge in the job market—something I wish I’d known when I was just starting out.

    The Right Tool for the Right Job

    Understanding the differences between Docker and Kubernetes helps you make better architectural decisions. Docker shines in container creation and development workflows, while Kubernetes excels in managing containers at scale in production environments.

    Most organizations use both technologies together: Docker for building containers and local development, and Kubernetes for orchestrating those containers in staging and production environments. This complementary approach has been the most successful in my experience.

    As you build your skills, remember that both technologies have their place in the modern deployment landscape. Rather than viewing them as competitors, think of them as complementary tools that solve different parts of the container lifecycle management puzzle.

    Ready to master Docker and Kubernetes to boost your career prospects? I’ve created detailed video tutorials based on my own learning journey from college to professional deployment. Check out our video lectures that break down these complex technologies into simple, actionable steps. And when you’re ready to showcase these valuable skills, use our Resume Builder to highlight your container expertise to potential employers!

    What has been your experience with Docker and Kubernetes? Are you just getting started or already using these technologies in production? Let me know in the comments below!

  • Master Kubernetes: 8 Essential Architecture Insights

    Master Kubernetes: 8 Essential Architecture Insights

    The world of containerized applications has exploded in recent years, and at the center of this revolution stands Kubernetes. I still remember my first encounter with container orchestration – a mess of Docker containers running across several servers with no centralized management. Today, Kubernetes has become the gold standard for managing containerized applications at scale.

    When I started Colleges to Career, our application deployment was a nightmare of manual processes. Now, with Kubernetes, we’ve transformed how we deliver services to students transitioning from academics to the professional world. This post will walk you through the essential architecture insights that helped me master Kubernetes – and can help you too.

    Understanding Kubernetes Fundamentals

    What is Kubernetes Architecture?

    Kubernetes (or K8s for short) is like a smart manager for your containerized applications. It’s an open-source system that handles all the tedious work of deploying, scaling, and managing your containers, so you don’t have to do it manually. Originally developed by Google based on their internal system called Borg, Kubernetes was released to the public in 2014.

    I first encountered Kubernetes architecture when our team at Colleges to Career needed to scale our resume builder tool. We had a growing user base of college students, and our manual Docker container management was becoming unsustainable.

    Key Takeaway: At its core, Kubernetes solves a fundamental problem: how do you efficiently manage hundreds or thousands of containers across multiple machines?

    Kubernetes handles the complex tasks of:

    • Deploying your applications
    • Scaling them up or down as needed
    • Rolling out new versions without downtime
    • Self-healing when containers crash

    For someone transitioning from college to a career in tech, understanding Kubernetes has become nearly as important as knowing a programming language.

    The Core Philosophy Behind Kubernetes

    What makes Kubernetes truly powerful is its underlying philosophy:

    Declarative configuration: Instead of telling Kubernetes exactly how to do something step by step (imperative), you simply declare what you want the end result to look like. Kubernetes figures out how to get there.

    This was a game-changer for our team. Instead of writing scripts detailing each step of deployment, we now simply describe our desired state in YAML files. Kubernetes handles the rest.

    Infrastructure as code: All configurations are defined in code that can be version-controlled, reviewed, and automated.

    When I implemented this at Colleges to Career, our deployment errors dropped dramatically. New team members could understand our infrastructure by reading the code rather than hunting through documentation.

    Kubernetes Architecture Deep Dive

    The Control Plane: Brain of the Cluster

    Think of the control plane as Kubernetes’ brain. It’s the command center that makes all the important decisions about your cluster and responds when things change or problems happen. When I first started troubleshooting our system, understanding the control plane components saved me countless hours.

    Key components include:

    API Server: This is the front door to Kubernetes. All commands and queries flow through here.

    I once spent a full day debugging an issue that turned out to be related to RBAC (Role-Based Access Control) permissions at the API server level. Lesson learned: understand your authentication mechanisms thoroughly.

    etcd: A distributed key-value store that stores all cluster data.

    Think of etcd as the cluster’s memory. Without proper backups of etcd, you risk losing your entire cluster state. We learned this the hard way during an early test environment failure.

    Scheduler: Determines which node should run each pod.

    Controller Manager: Runs controller processes that regulate the state of the cluster.

    Cloud Controller Manager: Interfaces with your cloud provider’s APIs.

    Key Takeaway: Understanding these control plane components is essential for troubleshooting issues in production. When something goes wrong, knowing where to look can save you hours of frustration.

    Worker Nodes: Where Applications Run

    While the control plane makes decisions, worker nodes are where your applications actually run. Each worker node contains:

    Kubelet: The primary node agent that ensures containers are running in a Pod.

    Container Runtime: The software responsible for running containers (Docker, containerd, CRI-O).

    Kube-proxy: Maintains network rules on nodes, enabling communication to your Pods.

    When we migrated from Docker Swarm to Kubernetes at Colleges to Career, the most noticeable difference was how the worker nodes handled failure. In Swarm, node failures often required manual intervention. With Kubernetes, pods automatically rescheduled to healthy nodes.

    Diagram showing Kubernetes architecture with control plane components and worker nodes. The control plane contains API Server, etcd, Scheduler, and Controller Manager. Worker nodes show kubelet, container runtime, and kube-proxy components.

    Essential Kubernetes Objects

    Pods: The Atomic Unit

    Pods are the smallest deployable units in Kubernetes. Think of a pod as a wrapper around one or more containers that always travel together.

    When building our interview preparation module, I discovered the power of the sidecar pattern – using a secondary container in the same pod to handle logging and monitoring while the main container focused on the application logic.

    Some key pod concepts:

    • Pods are temporary – they’re not designed to survive crashes or node failures
    • Multiple containers in a pod share the same network space and can talk to each other via localhost
    • Pod lifecycle includes phases like Pending, Running, Succeeded, Failed, and Unknown

    Deployments and ReplicaSets

    Deployments manage ReplicaSets, which ensure a specified number of pod replicas are running at any given time.

    When we launched our company search feature, we used a Deployment to manage our microservice. This allowed us to:

    • Scale the number of pods up during peak usage times (like graduation season)
    • Roll out updates gradually without downtime
    • Roll back to previous versions when we discovered issues

    The declarative nature of Deployments transformed our release process. Instead of manually orchestrating updates, we simply updated our Deployment YAML and applied it:

    apiVersion: apps/v1
    kind: Deployment
    metadata:
      name: company-search
    spec:
      replicas: 3
      selector:
        matchLabels:
          app: company-search
      template:
        metadata:
          labels:
            app: company-search
        spec:
          containers:
          - name: company-search
            image: collegestocareer/company-search:v1.2
            resources:
              requests:
                memory: "64Mi"
                cpu: "250m"
              limits:
                memory: "128Mi"
                cpu: "500m"
    

    Services and Ingress

    Services provide a stable way to access pods, even though pods come and go. Think of Services as a reliable front desk that always knows how to reach your application, no matter where it’s running.

    The different Service types include:

    • ClusterIP: Internal-only IP, accessible only within the cluster
    • NodePort: Exposes the Service on each Node’s IP at a static port
    • LoadBalancer: Uses your cloud provider’s load balancer
    • ExternalName: Maps the Service to a DNS name

    For our student-facing applications, we use Ingress resources to manage external access to services, providing HTTP/HTTPS routing, SSL termination, and name-based virtual hosting.

    Key Takeaway: Proper use of Services and Ingress enables reliable access to your applications despite the dynamic nature of pods.

    Frequently Asked Questions

    What makes Kubernetes different from Docker?

    Docker primarily focuses on creating and running individual containers, while Kubernetes orchestrates containers at scale. Think of Docker as a technology for running a single container, and Kubernetes as a system for running many containers across many machines.

    When I started working with containers, I used Docker directly. This worked fine for a handful of services but became unmanageable as we scaled. Kubernetes provided the orchestration layer we needed.

    How does Kubernetes help manage containerized applications?

    Kubernetes provides several key benefits for containerized applications:

    • Automated scaling: Adjust resources based on demand
    • Self-healing: Automatically replace failed containers
    • Service discovery: Easily find and communicate with services
    • Load balancing: Distribute traffic across healthy containers
    • Automated rollouts and rollbacks: Update applications without downtime

    For our resume builder service, Kubernetes automatically scales during peak usage periods (like graduation season) and scales down during quiet periods, saving us significant infrastructure costs.

    Is Kubernetes overkill for small applications?

    Honestly, yes, it can be. For a simple application with predictable traffic, Kubernetes adds complexity that might not be justified.

    For smaller applications or teams just starting out, I recommend:

    • Docker Compose for local development
    • Platform-as-a-Service options like Heroku
    • Managed container services like AWS Fargate or Google Cloud Run

    As your application grows, you can adopt Kubernetes when the benefits outweigh the operational complexity.

    How difficult is it to learn Kubernetes?

    Kubernetes has a steep learning curve, but it’s approachable with the right strategy. When I started learning Kubernetes for Colleges to Career, I took this approach:

    1. Start with the core concepts (pods, services, deployments)
    2. Build a simple application and deploy it to Kubernetes
    3. Gradually explore advanced features
    4. Learn from failures in a test environment

    Most newcomers get overwhelmed by trying to learn everything at once. Focus on the fundamentals first, and expand your knowledge as needed.

    What are the main challenges of running Kubernetes in production?

    The biggest challenges we’ve faced include:

    Operational complexity: Kubernetes has many moving parts that require understanding and monitoring.

    Resource overhead: The control plane and agents consume resources that could otherwise be used for applications.

    Skills requirements: Operating Kubernetes requires specialized knowledge that can be hard to find and develop.

    To overcome these challenges, we invested in:

    • Automation through CI/CD pipelines
    • Comprehensive monitoring and alerting
    • Regular team training and knowledge sharing
    • Starting with managed Kubernetes services before handling everything ourselves

    Advanced Architecture Concepts

    Kubernetes Networking Model

    Kubernetes networking is like a well-designed city road system. It follows these principles:

    • All pods can communicate with all other pods without address translation
    • All nodes can communicate with all pods without address translation
    • The IP that a pod sees itself as is the same IP that others see it as

    When implementing our networking solution, we debated between Calico and Flannel. We ultimately chose Calico for its network policy support, which helped us implement better security controls between our services.

    One particularly challenging issue we faced was debugging network connectivity problems between pods. Understanding the Kubernetes networking model was crucial for resolving these issues efficiently.

    Persistent Storage in Kubernetes

    For stateless applications, Kubernetes’ ephemeral nature is perfect. But what about databases and other stateful services?

    Kubernetes offers several abstractions for persistent storage:

    • Volumes: Temporary or persistent storage that can be mounted to a pod
    • PersistentVolumes: Cluster resources that outlive individual pods
    • PersistentVolumeClaims: Requests for storage by a user
    • StorageClasses: Parameters for dynamically provisioning storage

    For our resume data storage, we use StatefulSets with PersistentVolumeClaims to ensure data persistence even if pods are rescheduled.

    Comparing Managed Kubernetes Services

    If you’re just getting started with Kubernetes, I strongly recommend using a managed service instead of building your own cluster from scratch. The main options are:

    • Amazon EKS (Elastic Kubernetes Service): Integrates well with AWS services, but configuration can be complex
    • Google GKE (Google Kubernetes Engine): Offers the smoothest experience as Kubernetes originated at Google
    • Microsoft AKS (Azure Kubernetes Service): Good integration with Azure services and DevOps tools
    • Digital Ocean Kubernetes: Simpler option with transparent pricing, great for smaller projects

    We started with GKE for our production workloads because Google’s experience with Kubernetes translated to fewer operational issues. The auto-upgrade feature saved us considerable maintenance time.

    Deployment Strategies and Patterns

    Zero-downtime Deployment Techniques

    As our user base grew, we needed deployment strategies that ensured zero downtime. Kubernetes offers several options:

    Blue/Green Deployments: Run two identical environments, with one active (blue) and one idle (green). Switch traffic all at once.

    Canary Releases: Release changes to a small subset of users before full deployment. We use this for our resume builder updates, directing 5% of traffic to the new version before full rollout.

    Feature Flags: Toggle features on/off without code changes. This has been invaluable for testing new features with select user groups.

    Resource Management and Scaling

    Properly managing resources is crucial for cluster stability. Kubernetes uses:

    Resource Requests: The minimum amount of CPU and memory a container needs

    Resource Limits: The maximum amount of CPU and memory a container can use

    A mistake to avoid: When we first deployed Kubernetes, we didn’t set proper resource requests and limits. The result? During our busiest hours, some services starved for resources while others hogged them all. Our application became unstable, and users experienced random errors. Setting clear resource boundaries is like establishing good roommate rules – everyone gets their fair share.

    We also leverage:

    • Horizontal Pod Autoscaler: Automatically scales the number of pods based on observed CPU utilization or other metrics
    • Vertical Pod Autoscaler: Adjusts CPU and memory reservations based on usage
    • Cluster Autoscaler: Automatically adjusts the size of the Kubernetes cluster when pods fail to schedule

    Security Architecture

    Kubernetes Security Principles

    Security was a top concern when moving our student data to Kubernetes. We implemented:

    • Role-Based Access Control (RBAC): Limiting who can do what within the cluster
    • Network Policies: Controlling traffic flow between pods and namespaces
    • Pod Security Standards: Restricting pod privileges to minimize potential damage
    • Secrets Management: Securely storing and distributing sensitive information

    One lesson I learned the hard way: never run containers as root unless absolutely necessary. This simple principle prevents many potential security issues.

    Common Security Pitfalls

    Based on our experience, here are security mistakes to avoid:

    • Using the default service account with overly broad permissions
    • Failing to scan container images for vulnerabilities
    • Neglecting to encrypt secrets at rest
    • Running pods without security context restrictions
    • Exposing the Kubernetes dashboard without proper authentication

    When we first set up our cluster, we accidentally exposed the metrics server without authentication. Thankfully, we caught this during an internal security audit before any data was compromised.

    Observability and Monitoring

    Logging Architecture

    Without proper logging, debugging Kubernetes issues is like finding a needle in a haystack. We implemented:

    • Node-level logging for infrastructure issues
    • Application logs collected from each container
    • Log aggregation with Elasticsearch, Fluentd, and Kibana (EFK stack)

    This setup saved us countless hours during a critical incident when our resume builder service was experiencing intermittent failures. We traced the issue to a database connection pool configuration through centralized logs.

    Metrics and Monitoring

    For monitoring, we set up three essential tools that give us a complete picture of our system’s health:

    • Prometheus: Collects all the important numbers (metrics) from our system
    • Grafana: Turns those numbers into colorful, easy-to-understand dashboards
    • Custom metrics: Tracks business numbers that matter to us, like how many students use our resume builder each day

    Without these tools, we’d be flying blind. When our resume builder slowed down last semester, our monitoring dashboards immediately showed us the database was the bottleneck.

    Production-Ready Considerations

    High Availability Configuration

    In production, a single point of failure is unacceptable. We implemented:

    • Multi-master control plane with staggered upgrades
    • Etcd cluster with at least three nodes
    • Worker nodes spread across multiple availability zones

    These changes significantly improved our platform stability. In the last year, we’ve maintained 99.9% uptime despite several infrastructure incidents.

    Disaster Recovery Strategies

    Even with high availability, disasters can happen. Our disaster recovery plan includes:

    • Regular etcd backups
    • Infrastructure as code for quick recreation
    • Documented recovery procedures
    • Regular disaster recovery drills

    We test our disaster recovery plan quarterly, simulating various failure scenarios to ensure we can recover quickly.

    Key Takeaway: Preparation is everything. The time to figure out your recovery strategy is not during an outage.

    Conclusion

    Kubernetes has transformed how we deploy and manage applications at Colleges to Career. The journey from manually managing containers to orchestrating them with Kubernetes wasn’t always smooth, but the benefits have been tremendous.

    The eight essential architecture insights we’ve covered – from understanding the control plane to implementing disaster recovery strategies – form the foundation of a successful Kubernetes implementation.

    Remember that mastering Kubernetes architecture is a journey. Start small, learn from mistakes, and continuously improve your understanding. The skills you develop will be invaluable as you transition from college to a career in technology.

    Ready to Advance Your Kubernetes Knowledge?

    Want to dive deeper into these concepts? Check out our free video lectures on Kubernetes and cloud technologies. These resources are specifically designed to help students master the skills most valued in today’s job market.

    For those preparing for technical interviews, we’ve also compiled a comprehensive set of Kubernetes and cloud-native interview questions that will help you stand out to potential employers.

    Whether you’re just starting your career or looking to level up your skills, understanding Kubernetes architecture is becoming an essential skill in the modern technology landscape. Take the time to master it, and you’ll open doors to exciting opportunities in cloud computing, DevOps, and software engineering.

    Have questions about implementing Kubernetes in your projects? Drop them in the comments below, and I’ll do my best to help!

  • How to Scale Kubernetes Clusters for High-Traffic Applications

    How to Scale Kubernetes Clusters for High-Traffic Applications

    Introduction

    Kubernetes has become the de facto standard for container orchestration, offering a powerful platform for deploying, managing, and scaling applications. However, handling high-traffic applications requires careful planning and optimization to ensure that the cluster can handle increased loads without degradation in performance. In this guide, we’ll explore how to scale a Kubernetes cluster effectively and key considerations for high-traffic applications.

    Understanding Kubernetes Scaling

    Scaling in Kubernetes can be categorized into two main types:

    1. Vertical Scaling – Increasing the resources (CPU, memory) allocated to a pod.
    2. Horizontal Scaling – Increasing the number of pods or nodes in the cluster.

    Both methods have their use cases, and in most scenarios, a combination of the two is required to optimize performance under high traffic.

    How Do I Scale a Kubernetes Cluster?

    Scaling a Kubernetes cluster involves various strategies, including pod autoscaling, node autoscaling, and workload optimization. Below are key approaches:

    1. Horizontal Pod Autoscaler (HPA)

    The Horizontal Pod Autoscaler (HPA) automatically adjusts the number of running pods based on observed CPU or memory usage, or custom metrics.

    Steps to Enable HPA:

    1. Ensure metrics-server is installed: kubectl apply -f https://github.com/kubernetes-sigs/metrics-server/releases/latest/download/components.yaml
    2. Define an HPA resource in YAML: apiVersion: autoscaling/v2beta2 kind: HorizontalPodAutoscaler metadata: name: my-app-hpa spec: scaleTargetRef: apiVersion: apps/v1 kind: Deployment name: my-app minReplicas: 2 maxReplicas: 10 metrics: - type: Resource resource: name: cpu target: type: Utilization averageUtilization: 75
    3. Apply the configuration: kubectl apply -f hpa.yaml

    2. Cluster Autoscaler

    Cluster Autoscaler automatically adjusts the number of nodes in the cluster based on pending pod demands. This is useful when the workload exceeds the capacity of available nodes.

    Enabling Cluster Autoscaler:

    • For AWS EKS: eksctl create cluster --name high-traffic-cluster --nodegroup-name scalable-group --nodes 3 --nodes-min 2 --nodes-max 10
    • For GKE: gcloud container clusters create high-traffic-cluster --enable-autoscaling --min-nodes 2 --max-nodes 10
    • For AKS: az aks create --resource-group myResourceGroup --name high-traffic-cluster --enable-cluster-autoscaler --min-count 2 --max-count 10

    3. Load Balancing and Ingress Optimization

    A load balancer helps distribute traffic evenly across pods, ensuring high availability and performance. Kubernetes provides different types of load balancing:

    • Service LoadBalancer: Directs external traffic to backend pods.
    • Ingress Controller: Manages routing rules for HTTP(S) traffic.
    • Internal LoadBalancer: Distributes traffic within the cluster.

    Example of an Ingress Controller:

    apiVersion: networking.k8s.io/v1
    kind: Ingress
    metadata:
      name: my-app-ingress
    spec:
      rules:
        - host: myapp.example.com
          http:
            paths:
              - path: /
                pathType: Prefix
                backend:
                  service:
                    name: my-app-service
                    port:
                      number: 80
    

    4. Resource Requests and Limits

    To ensure fair resource distribution, define requests (minimum required resources) and limits (maximum allowed resources) in pod configurations.

    Example:

    resources:
      requests:
        cpu: "500m"
        memory: "256Mi"
      limits:
        cpu: "1000m"
        memory: "512Mi"
    

    5. Caching and Database Optimization

    Using caching mechanisms like Redis, Memcached, or CDNs reduces the load on the application. Additionally, Read Replicas in databases can distribute queries across multiple instances to handle more read requests.

    What Factors Should I Consider for High-Traffic Applications?

    Scaling a Kubernetes cluster efficiently requires consideration of several factors:

    1. Traffic Patterns

    • Identify peak usage times and scale accordingly.
    • Implement rate limiting to prevent abuse.

    2. Pod Distribution and Affinity

    • Use pod anti-affinity to distribute pods across multiple nodes for high availability.
    • Example: affinity: podAntiAffinity: requiredDuringSchedulingIgnoredDuringExecution: - labelSelector: matchExpressions: - key: app operator: In values: - my-app topologyKey: "kubernetes.io/hostname"

    3. Network Performance

    • Use CNI plugins (e.g., Calico, Cilium) for optimized networking.
    • Implement service mesh solutions like Istio or Linkerd for better traffic management.

    4. Security and Observability

    • Enable logging with Fluentd, ELK, or Loki.
    • Use Prometheus and Grafana for monitoring.
    • Implement RBAC policies to enforce security.

    Conclusion

    Scaling Kubernetes clusters for high-traffic applications involves a combination of horizontal and vertical scaling, autoscalers, load balancing, and resource optimization. By leveraging tools like HPA, Cluster Autoscaler, Ingress controllers, and caching mechanisms, you can ensure your application handles traffic spikes efficiently while maintaining high availability and performance.

    By following these best practices, you can build a robust and scalable Kubernetes deployment capable of handling high-traffic applications seamlessly.


    Related Questions

    Q: How do I scale a Kubernetes cluster?
    A: Use Horizontal Pod Autoscaler (HPA) for pod scaling, Cluster Autoscaler for node scaling, and optimize resource requests/limits.

    Q: What factors should I consider for high-traffic applications?
    A: Consider traffic patterns, resource allocation, network performance, security, observability, and caching strategies to ensure efficient scaling and stability.

    For more Kubernetes tutorials, stay tuned for our next guide!

  • Kubernetes for Beginners: Everything You Need to Know

    Kubernetes for Beginners: Everything You Need to Know

    Introduction

    Kubernetes is an open-source container orchestration platform that automates the deployment, scaling, and management of containerized applications. Originally developed by Google and introduced in 2014, Kubernetes has become a cornerstone of modern cloud-native application development and operations. Its evolution from Google’s internal system, Borg, to a widely adopted framework reflects the growing need for efficient management of distributed applications, particularly in the context of microservices architecture and DevOps practices.

    By 2020, over 85% of enterprises had embraced container technologies, with Kubernetes serving as the de facto standard for orchestration and management. Understanding its architecture, key concepts, and best practices is crucial for anyone looking to leverage Kubernetes effectively.


    What is Kubernetes?

    Kubernetes, often abbreviated as K8s, is an open-source container orchestration system designed to automate the deployment, scaling, and operation of application containers across clusters of hosts. It provides a framework for running distributed systems resiliently, handling networking, storage, and security seamlessly. Kubernetes abstracts the underlying infrastructure, allowing developers to focus on building and deploying applications without worrying about the complexity of managing individual containers.

    Kubernetes ensures high availability, load balancing, and self-healing capabilities, making it a preferred choice for running microservices-based applications. It also integrates well with cloud-native tools and platforms, enhancing DevOps workflows and continuous deployment processes.


    History of Kubernetes

    Kubernetes was originally developed by Google and introduced as an open-source project in 2014. It was inspired by Google’s internal container orchestration system, Borg, which managed large-scale containerized applications. As microservices architecture gained traction, Kubernetes emerged as a solution to address the complexities of deploying and maintaining numerous containers and services.

    The platform has undergone several significant updates since its inception. Each major release has introduced new features, such as stable volume expansion and improved security mechanisms. Kubernetes’ community-driven approach has played a crucial role in its continuous evolution, ensuring it remains adaptable to the ever-changing technological landscape.


    Kubernetes Architecture

    Kubernetes architecture consists of two primary components: the Control Plane and Worker Nodes. Understanding these components is fundamental for beginners.

    Control Plane

    The Control Plane manages the state of the cluster and includes the following components:

    • kube-apiserver: The core component that exposes the Kubernetes API, enabling communication within the cluster.
    • etcd: A consistent and highly available key-value store that maintains critical cluster data.
    • kube-scheduler: Evaluates resource requirements and assigns Pods to appropriate Worker Nodes.
    • kube-controller-manager: Runs various controllers that monitor and maintain the desired states of Kubernetes objects.
    • cloud-controller-manager: Integrates with cloud provider services for cloud-specific operations.

    Worker Nodes

    Worker Nodes execute the actual workloads and applications. They contain the following components:

    • kubelet: Ensures that containers are running and manages the container runtime environment.
    • kube-proxy: Maintains network rules for communication between Pods.
    • Container Runtime: Runs containers within the Pods (e.g., Docker, containerd).

    Getting Started with Kubernetes

    For beginners, setting up a local Kubernetes cluster is a great way to start experimenting with its features. One of the simplest methods is using Minikube, which allows you to run Kubernetes on your local machine.

    How Do I Get Started with Kubernetes as a Beginner?

    Starting with Kubernetes can seem overwhelming, but following a structured approach will make the learning curve manageable:

    1. Learn the Basics: Familiarize yourself with containerization concepts using Docker.
    2. Set Up a Local Kubernetes Environment: Install Minikube and kubectl.
    3. Deploy Sample Applications: Experiment with basic Deployments and Services.
    4. Explore Kubernetes Resources: Learn about Pods, ConfigMaps, Secrets, and Namespaces.
    5. Monitor and Debug: Use tools like Prometheus and kubectl logs to gain insights into your cluster.
    6. Advance to Cloud Deployments: Try Kubernetes on cloud providers like AWS EKS, Google GKE, or Azure AKS.

    Setting Up Minikube

    1. Download and install Minikube based on your operating system.
    2. Install kubectl, the Kubernetes command-line tool.
    3. Start a Kubernetes cluster using: minikube start
    4. Verify the installation with: kubectl get nodes

    Once Minikube is set up, you can deploy a simple application and explore Kubernetes’ capabilities.

    Deploying a Basic Application

    1. Create a Deployment: kubectl create deployment nginx --image=nginx
    2. Expose the Deployment as a Service: kubectl expose deployment nginx --type=NodePort --port=80
    3. Get the URL of the application: minikube service nginx --url

    This will allow you to access your deployed application via a web browser.


    Key Kubernetes Concepts

    Understanding the fundamental concepts of Kubernetes is crucial for managing containerized applications efficiently.

    Pods

    A Pod is the smallest deployable unit in Kubernetes. It represents a single instance of a running process and can contain one or more containers. Pods provide a cohesive environment for containers to share storage and network resources.

    Services

    Kubernetes Services enable communication between different parts of an application. There are several types:

    • ClusterIP: Accessible only within the cluster.
    • NodePort: Exposes the service on a static port on each node.
    • LoadBalancer: Uses an external load balancer for access from outside the cluster.

    Deployments

    A Deployment manages the deployment and scaling of Pods. It ensures that the correct number of replicas are running and facilitates rolling updates and rollbacks.

    ConfigMaps & Secrets

    • ConfigMaps store non-sensitive configuration data in key-value pairs.
    • Secrets store sensitive information such as passwords and API keys securely.

    ReplicaSets

    A ReplicaSet ensures that a specified number of Pod replicas are running at all times, maintaining high availability and resilience.


    Conclusion

    Kubernetes is a powerful platform for managing containerized applications, offering automation, scalability, and resilience. While it comes with challenges, understanding its core concepts and best practices will help beginners navigate its complexities. With continuous learning and hands-on experimentation, Kubernetes can become an invaluable tool in modern DevOps and cloud-native development.

    By mastering Kubernetes, developers and IT professionals can streamline application deployment, enhance operational efficiency, and future-proof their infrastructure.


    Additional Resources

    For those looking to dive deeper into Kubernetes, consider exploring:

  • Kubernetes vs Docker Swarm: Which is Better?

    Kubernetes vs Docker Swarm: Which is Better?

    Container orchestration is essential for managing modern applications, and two of the most popular tools in this space are Kubernetes and Docker Swarm. Both offer powerful features, but they cater to different use cases. This blog will explore their key differences and determine which is better for container orchestration.

    Key Differences Between Kubernetes and Docker Swarm

    1. Ease of Setup and Configuration:
      • Kubernetes: Complex to set up, requiring multiple components and configurations.
      • Docker Swarm: Easier to set up with simple commands and configurations.
    2. Scalability:
      • Kubernetes: Designed for high scalability with automated load balancing and advanced scaling features.
      • Docker Swarm: Scales quickly but lacks advanced scaling capabilities compared to Kubernetes.
    3. Load Balancing:
      • Kubernetes: Offers built-in service discovery and advanced load balancing.
      • Docker Swarm: Provides simple internal load balancing but lacks Kubernetes’ flexibility.
    4. Networking:
      • Kubernetes: Uses a flat networking model with multiple networking plugins.
      • Docker Swarm: Uses an overlay network that is simpler to configure.
    5. Storage Management:
      • Kubernetes: Supports persistent storage using multiple backends like AWS EBS, Azure Disks, and NFS.
      • Docker Swarm: Supports persistent storage but with fewer options.
    6. Security:
      • Kubernetes: Offers robust security features, including RBAC (Role-Based Access Control) and secrets management.
      • Docker Swarm: Has basic security features but lacks fine-grained access control.
    7. Community and Ecosystem:
      • Kubernetes: Backed by a vast community with extensive documentation and support.
      • Docker Swarm: Has a smaller community and fewer integrations compared to Kubernetes.

    Which is Better for Container Orchestration?

    The choice between Kubernetes and Docker Swarm depends on your needs:

    • Choose Kubernetes if you need:
      • Advanced orchestration capabilities.
      • High availability and scalability.
      • Strong security and enterprise-level features.
      • A large ecosystem with strong community support.
    • Choose Docker Swarm if you need:
      • A simple and quick setup.
      • Lightweight orchestration for smaller applications.
      • A solution that integrates seamlessly with Docker.

    Conclusion

    Kubernetes is the industry standard for container orchestration due to its robust features, scalability, and strong security. However, Docker Swarm remains a great choice for simpler deployments where ease of use and speed are the primary concerns. Ultimately, the right tool depends on your specific use case and operational requirements.

  • Introduction to Kubernetes

    Introduction to Kubernetes

    What is Kubernetes?


    Why Kubernetes?

    Modern software applications are increasingly built using microservices architectures and deployed in containers using Docker or similar technologies. While containers provide flexibility and efficiency, managing them manually across multiple servers can be challenging. Kubernetes solves this problem by offering:

    • Automated Deployment & Scaling – Deploy applications easily and scale them up or down based on demand.
    • Load Balancing & Service Discovery – Distribute traffic efficiently and automatically detect services.
    • Self-Healing Capabilities – Restart failed containers, replace them, and reschedule workloads when necessary.
    • Efficient Resource Utilization – Optimize how resources like CPU and memory are allocated.
    • Multi-Cloud & Hybrid Cloud Support – Deploy applications across various cloud providers or on-premises environments.

    Key Components of Kubernetes

    Kubernetes consists of multiple components that work together to manage containerized applications effectively. The core components include:

    1. Cluster Architecture

    A Kubernetes cluster consists of two primary parts:

    • Control Plane (Master Node) – Manages the entire cluster and makes global decisions about scheduling and scaling.
    • Worker Nodes – Run containerized applications using Pods.

    2. Pods

    A Pod is the smallest deployable unit in Kubernetes. It contains one or more containers that share networking and storage resources.

    3. Nodes

    A Node is a machine (physical or virtual) that runs workloads. It contains a Kubelet (agent that communicates with the control plane) and a container runtime (such as Docker or containerd).

    4. Services

    A Service provides a stable way to expose and access a group of Pods. Kubernetes supports various service types like ClusterIP, NodePort, and LoadBalancer.

    5. Deployments

    A Deployment defines how Pods should be created, updated, and managed. It ensures that the desired number of Pods are always running.

    6. ConfigMaps & Secrets

    • ConfigMaps allow external configuration data to be injected into applications.
    • Secrets store sensitive information like API keys and passwords securely.

    7. Ingress Controller

    An Ingress Controller manages external access to services using HTTP(S) routing and load balancing.


    How Kubernetes Works

    The basic workflow of Kubernetes involves several steps:

    1. Define Application Configuration – Developers write YAML files to specify application requirements (Pods, Services, Deployments, etc.).
    2. Deploy to a Cluster – The Kubernetes API schedules the workload on available worker nodes.
    3. Monitor & Scale – Kubernetes automatically monitors application performance and scales as needed.
    4. Self-Healing & Updates – Kubernetes replaces failed Pods and allows rolling updates without downtime.

    Benefits of Using Kubernetes

    1. High Availability & Fault Tolerance

    Kubernetes ensures applications remain available by automatically restarting failed containers and distributing workloads across multiple nodes.

    2. Improved Scalability

    It dynamically scales applications based on traffic and resource consumption.

    3. Portability & Flexibility

    Kubernetes can run on-premises, in public clouds (AWS, Azure, Google Cloud), or in hybrid environments, providing flexibility.

    4. DevOps & CI/CD Integration

    Kubernetes works seamlessly with DevOps pipelines, enabling Continuous Integration and Continuous Deployment (CI/CD) for faster software releases.

    5. Cost Efficiency

    By optimizing resource utilization, Kubernetes helps reduce infrastructure costs.


    Getting Started with Kubernetes

    1. Install Kubernetes – Use Kubernetes distributions like Minikube (local setup) or Kubernetes on cloud providers (AKS, EKS, GKE).
    2. Deploy Applications – Write YAML configuration files and use kubectl commands to deploy workloads.
    3. Monitor & Scale – Use Kubernetes dashboards and logging tools like Prometheus and Grafana.
    4. Manage Networking & Security – Configure Ingress, Network Policies, and Secrets for secure application deployment.

    Conclusion

    Kubernetes is a powerful container orchestration platform that simplifies the deployment and management of modern applications. It enables automation, scalability, and reliability, making it the go-to solution for organizations adopting cloud-native architectures.

    Whether you’re a developer, system administrator, or DevOps engineer, learning Kubernetes is essential in today’s cloud computing landscape. Start exploring Kubernetes today and transform the way you deploy applications!